Please note: heco gmbh will discontinue support for Internet Explorer in early 2021.
We recommend Microsoft Edge , which is already installed on Windows 10, also Google Chrome or Mozilla Firefox.
stainless steel
Departments

stainless steel

stainless steel
Newsletter

stainless steel
Material
Shipping conditions
- Butt welding fittings
- bends
- T- X- Y- pieces
- T- and Y-bends
- reducers
- caps and heads
- collars
- branch saddles
- orbital fittings
- ANSI / ASME
- Industrial valves
- ball valves
- actuators
- drain cocks
- gate valves
- globe valves
- non-return valves
- Y-strainers
- control technology
- Flanges
- welding neck flanges
- threaded flanges
- blind flanges
- plate flanges
- loose plate flanges
- collars
- flange-fittings
- ANSI/ ASME
- other
- Systems
- TEEKAY
- Victaulic
- press fittings
- quick couplings
- clamp connections
- cutting rings
- DIN 11864/ DIN 11853
- railing construction
- Beverage fittings
- unions
- fittings
- pipe clamps
- Tri-Clamp
- valves & cocks
- flange connections
- inspection glasses
- filter & strainers
- spray balls
Diesen Artikel aus der Anfrageliste entfernen?
Ja
Nein
Ok
Ok

Hint
By clicking on this bar you'll return to the table view.
Don't show this hint again!
measures and values
development of stocks
request list
associated articles
current selection
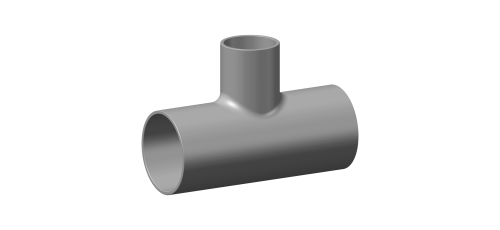
T-piece reduced, weldedRT.


T-piece reduced, welded EN 10253-4 (DIN 2615-W)
T-piece with reduced branch
EN 10253-4 (old DIN 2615)
| Version |
|---|
| Type A (Identical wall thickness on the welded end and shaped piece body) |
| W (welded) - from welded tube acc. to EN 10217-7 |
| cold reshaped (pressed or drawn) |
| solution annealed |
| pickled surface |
| material: 1.4541, 1.4571 |
| Certificate acc. to EN 10204/3.1 |
Tolerances
| Limit deviations for wall thickness [s] |
|---|
| -12 % / +15 % |
| Limit deviations for diameter [D] |
|---|
| +/- 1,0 % oder +/- 0,5 mm, the relevant higher value applies (EN tolerance class D2) |
| Limit deviations fo dimensions [l] |
|---|
| ≤ 219,1 = ± 2 mm |
| ≤ 406,4 = ± 5 mm |
| Lmit deviations for shaped piece geometry [X] |
|---|
| X = 1 % of the outside-Ø or 1 mm, the higher value applies |
EN 10253-4 (DIN 2615-W)
extended product description
<p><b>T-piece with reduced branch</b></p><p><span class="tDescSmall">EN 10253-4 (old DIN 2615)</span></p><br><table class="techDescTable"><thead><tr><th><b>Version</b></th></tr> </thead><tbody><tr class="Even"><td>Type A (Identical wall thickness on the welded end and shaped piece body)</td></tr><tr class="UnEven"><td>W (welded) - from welded tube acc. to EN 10217-7</td></tr><tr class="Even"><td>cold reshaped (pressed or drawn)</td></tr><tr class="UnEven"><td>solution annealed</td></tr><tr class="Even"><td>pickled surface</td></tr><tr class="UnEven"><td>material: 1.4541, 1.4571</td></tr><tr class="Even"><td>Certificate acc. to EN 10204/3.1</td></tr></tbody></table><br><p><b>Tolerances</b></p><br><table class="techDescTable"><thead><tr><th><b>Limit deviations for wall thickness [s]</b></th></tr> </thead><tbody><tr class="Even"><td>-12 % / +15 %</td></tr></tbody></table><table class="techDescTable"><thead><tr><th><b>Limit deviations for diameter [D]</b></th></tr> </thead><tbody><tr class="Even"><td>+/- 1,0 % oder +/- 0,5 mm, the relevant higher value applies (EN tolerance class D2)</td></tr></tbody></table><table class="techDescTable"><thead><tr><th><b>Limit deviations fo dimensions [l]</b></th></tr> </thead><tbody><tr class="Even"><td>≤ 219,1 = ± 2 mm</td></tr><tr class="UnEven"><td>≤ 406,4 = ± 5 mm</td></tr></tbody></table><br><table class="techDescTable"><thead><tr><th><b>Lmit deviations for shaped piece geometry [X]</b></th></tr> </thead><tbody><tr class="Even"><td>X = 1 % of the outside-Ø or 1 mm, the higher value applies</td></tr></tbody></table>
extended product description
material
1.4404 >>
1.4541 >>
1.4571 >>
You can find the accordings material data sheets in the category Interesting facts
measures and values
stocks and pricing
downloads
Stock and price list
T-piece reduced, welded
EN 10253-4 (DIN 2615-W)
The document will be created with lastest data.
CAD
associated articles
T-piece reduced short extended
Ask our experts
phone
Chat
We are online!
For technical questions about our products or instructions for handling our website please consult experts in our chat.
offline
Availability
We are online on Monday till Friday from 8am to 5pm.
E-Mail
Business card
Stainless steel T- X- Y- pieces welded & reduced DIN EN 10253-4
T-piece reduced, weldedRT.

Product specification
T-piece reduced, welded
EN 10253-4 (DIN 2615-W)
T-piece with reduced branch
EN 10253-4 (old DIN 2615)
| Version |
|---|
| Type A (Identical wall thickness on the welded end and shaped piece body) |
| W (welded) - from welded tube acc. to EN 10217-7 |
| cold reshaped (pressed or drawn) |
| solution annealed |
| pickled surface |
| material: 1.4541, 1.4571 |
| Certificate acc. to EN 10204/3.1 |
Tolerances
| Limit deviations for wall thickness [s] |
|---|
| -12 % / +15 % |
| Limit deviations for diameter [D] |
|---|
| +/- 1,0 % oder +/- 0,5 mm, the relevant higher value applies (EN tolerance class D2) |
| Limit deviations fo dimensions [l] |
|---|
| ≤ 219,1 = ± 2 mm |
| ≤ 406,4 = ± 5 mm |
| Lmit deviations for shaped piece geometry [X] |
|---|
| X = 1 % of the outside-Ø or 1 mm, the higher value applies |
measures and values
This view is not optimized for mobile devices.
You can change back to desktop view.
stocks and pricing
This view is not optimized for mobile devices.
You can change back to desktop view.
downloads
Stock and price list
T-piece reduced, welded
EN 10253-4 (DIN 2615-W)
The document will be created with lastest data.
CAD
associated articles
T-piece reduced short extended
Ask our experts
phone
Chat
We are online!
For technical questions about our products or instructions for handling our website please consult experts in our chat.
offline
Availability
We are online on Monday till Friday from 8am to 5pm.
E-Mail
Business card


