

- Butt welding fittings
- bends
- T- X- Y- pieces
- T- and Y-bends
- reducers
- caps and heads
- collars
- branch saddles
- orbital fittings
- ANSI / ASME
- Industrial valves
- ball valves
- actuators
- drain cocks
- gate valves
- globe valves
- non-return valves
- Y-strainers
- control technology
- Flanges
- welding neck flanges
- threaded flanges
- blind flanges
- plate flanges
- loose plate flanges
- collars
- flange-fittings
- ANSI/ ASME
- other
- Systems
- TEEKAY
- Victaulic
- press fittings
- quick couplings
- clamp connections
- cutting rings
- DIN 11864/ DIN 11853
- railing construction
- Beverage fittings
- unions
- fittings
- pipe clamps
- Tri-Clamp
- valves & cocks
- flange connections
- inspection glasses
- filter & strainers
- spray balls

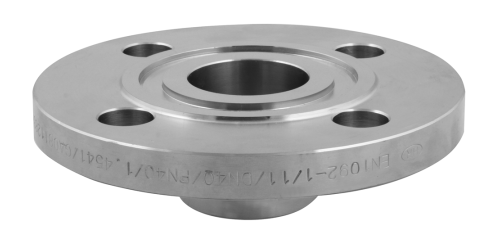
welding neck flange PN 100FL.N100


welding neck flange PN 100 with groove DIN 2637/ 2512
Welding neck flange PN 100 according to DIN 2637
Seal surface with groove
according to DIN 2512 Shape N
Table of dimensions
| DN | Øz | Øy | f1 | f3 | d4 |
|---|---|---|---|---|---|
| 10 | 19 | 31 | 2,0 | 2,5 | 40 |
| 15 | 28 | 40 | 2,0 | 2,5 | 45 |
| 25 | 42 | 58 | 2,0 | 2,5 | 68 |
| 40 | 60 | 76 | 3,0 | 2,5 | 88 |
| 50 | 72 | 88 | 3,0 | 2,5 | 102 |
| 65 | 94 | 110 | 3,0 | 2,5 | 122 |
| 80 | 105 | 121 | 3,0 | 2,5 | 138 |
| 100 | 128 | 150 | 3,0 | 3,0 | 162 |
| 125 | 154 | 176 | 3,0 | 3,0 | 188 |
| 150 | 182 | 204 | 3,0 | 3,0 | 218 |
| 200 | 238 | 260 | 3,0 | 3,0 | 285 |
| 250 | 291 | 313 | 3,0 | 3,0 | 345 |
| 300 | 342 | 364 | 4,0 | 3,0 | 410 |
| 350 | 394 | 422 | 4,0 | 3,5 | 465 |
All dimensions in mm
Comparison of dimension DIN 2512 and EN 1092-1
The overall dimensions of the tongues and grooves according to DIN EN 1092-1 are designed
lower or higher than according to DIN 2512 (Form N or Form F), issued 1975.
Seals
Gaskets according to DIN 2691 are used as static seals for flanges with a tongue and groove,
for example in high pressure quality graphite, elastomers, and plastics.
extended product description
Stainless steel welding neck flanges more sealing surfaces with groove
welding neck flange PN 100FL.N100

Welding neck flange PN 100 according to DIN 2637
Seal surface with groove
according to DIN 2512 Shape N
Table of dimensions
| DN | Øz | Øy | f1 | f3 | d4 |
|---|---|---|---|---|---|
| 10 | 19 | 31 | 2,0 | 2,5 | 40 |
| 15 | 28 | 40 | 2,0 | 2,5 | 45 |
| 25 | 42 | 58 | 2,0 | 2,5 | 68 |
| 40 | 60 | 76 | 3,0 | 2,5 | 88 |
| 50 | 72 | 88 | 3,0 | 2,5 | 102 |
| 65 | 94 | 110 | 3,0 | 2,5 | 122 |
| 80 | 105 | 121 | 3,0 | 2,5 | 138 |
| 100 | 128 | 150 | 3,0 | 3,0 | 162 |
| 125 | 154 | 176 | 3,0 | 3,0 | 188 |
| 150 | 182 | 204 | 3,0 | 3,0 | 218 |
| 200 | 238 | 260 | 3,0 | 3,0 | 285 |
| 250 | 291 | 313 | 3,0 | 3,0 | 345 |
| 300 | 342 | 364 | 4,0 | 3,0 | 410 |
| 350 | 394 | 422 | 4,0 | 3,5 | 465 |
All dimensions in mm
Comparison of dimension DIN 2512 and EN 1092-1
The overall dimensions of the tongues and grooves according to DIN EN 1092-1 are designed
lower or higher than according to DIN 2512 (Form N or Form F), issued 1975.
Seals
Gaskets according to DIN 2691 are used as static seals for flanges with a tongue and groove,
for example in high pressure quality graphite, elastomers, and plastics.
This view is not optimized for mobile devices.
You can change back to desktop view.
This view is not optimized for mobile devices.
You can change back to desktop view.


